The title is tongue in cheek, I don’t know what I’m doing either.
However, since I have been asked how I make these, I’ll try to share the little knowledge I have, my experiences, and my “process.” Many of the concepts will apply to “traditional” comic creation, but I will obviously spend a few paragraphs on the more image-gen-specific issues as well. Who knows — maybe this could be built into a generally useful guide for everyone over time!
We will be working our way down from the bigger picture to the smaller details. So we go from page, to panel, and end with typesetting.
What should I even put on my page?
Well, that’s obviously a pretty broad topic, and if you’re here, you most probably already have an idea of what you want to make in the first place. But bear with me, there are a few points I’m trying to get across, alright?
- Not every theme is suited for a comic. Some scenes may work better as a normal sequential (CG) image set, while others may lend themselves more to writing. So spending a little extra time thinking things through before diving in might be a good idea.
- The next step is to figure out how many pages you’ll actually need to get your idea across. This most likely won’t pan out exactly as planned, but at least you won’t end up with a 10+ page comic when you originally planned for 3.
- Then, roughly plan out your current page. Get a general idea of how many panels you want, how you could arrange them, and start developing mental images of your “key panels.” By “key panels,” I mean the ones that move things forward — there’s probably at least one at the beginning, the middle, and the end of the page.
- Some “traditional” brainstorming methods are probably helpful here. Take notes on your planned panel compositions, maybe sketch them out very roughly, etc. If you keep these around, you’ll also have a nice comparison between your original plans and what you actually end up with. Might be pretty amusing to look back on later—it certainly was in my case 😅
- Getting a feeling for how many panels you need, what they should contain, etc., is… well, tough, to say the least. And I can tell you, I’m pretty bad at it. Quite a bit of “pivoting” is involved in the stuff I’ve made. But pages I could plan out reasonably well beforehand ended up being a lot less of a hassle to make.
Example:
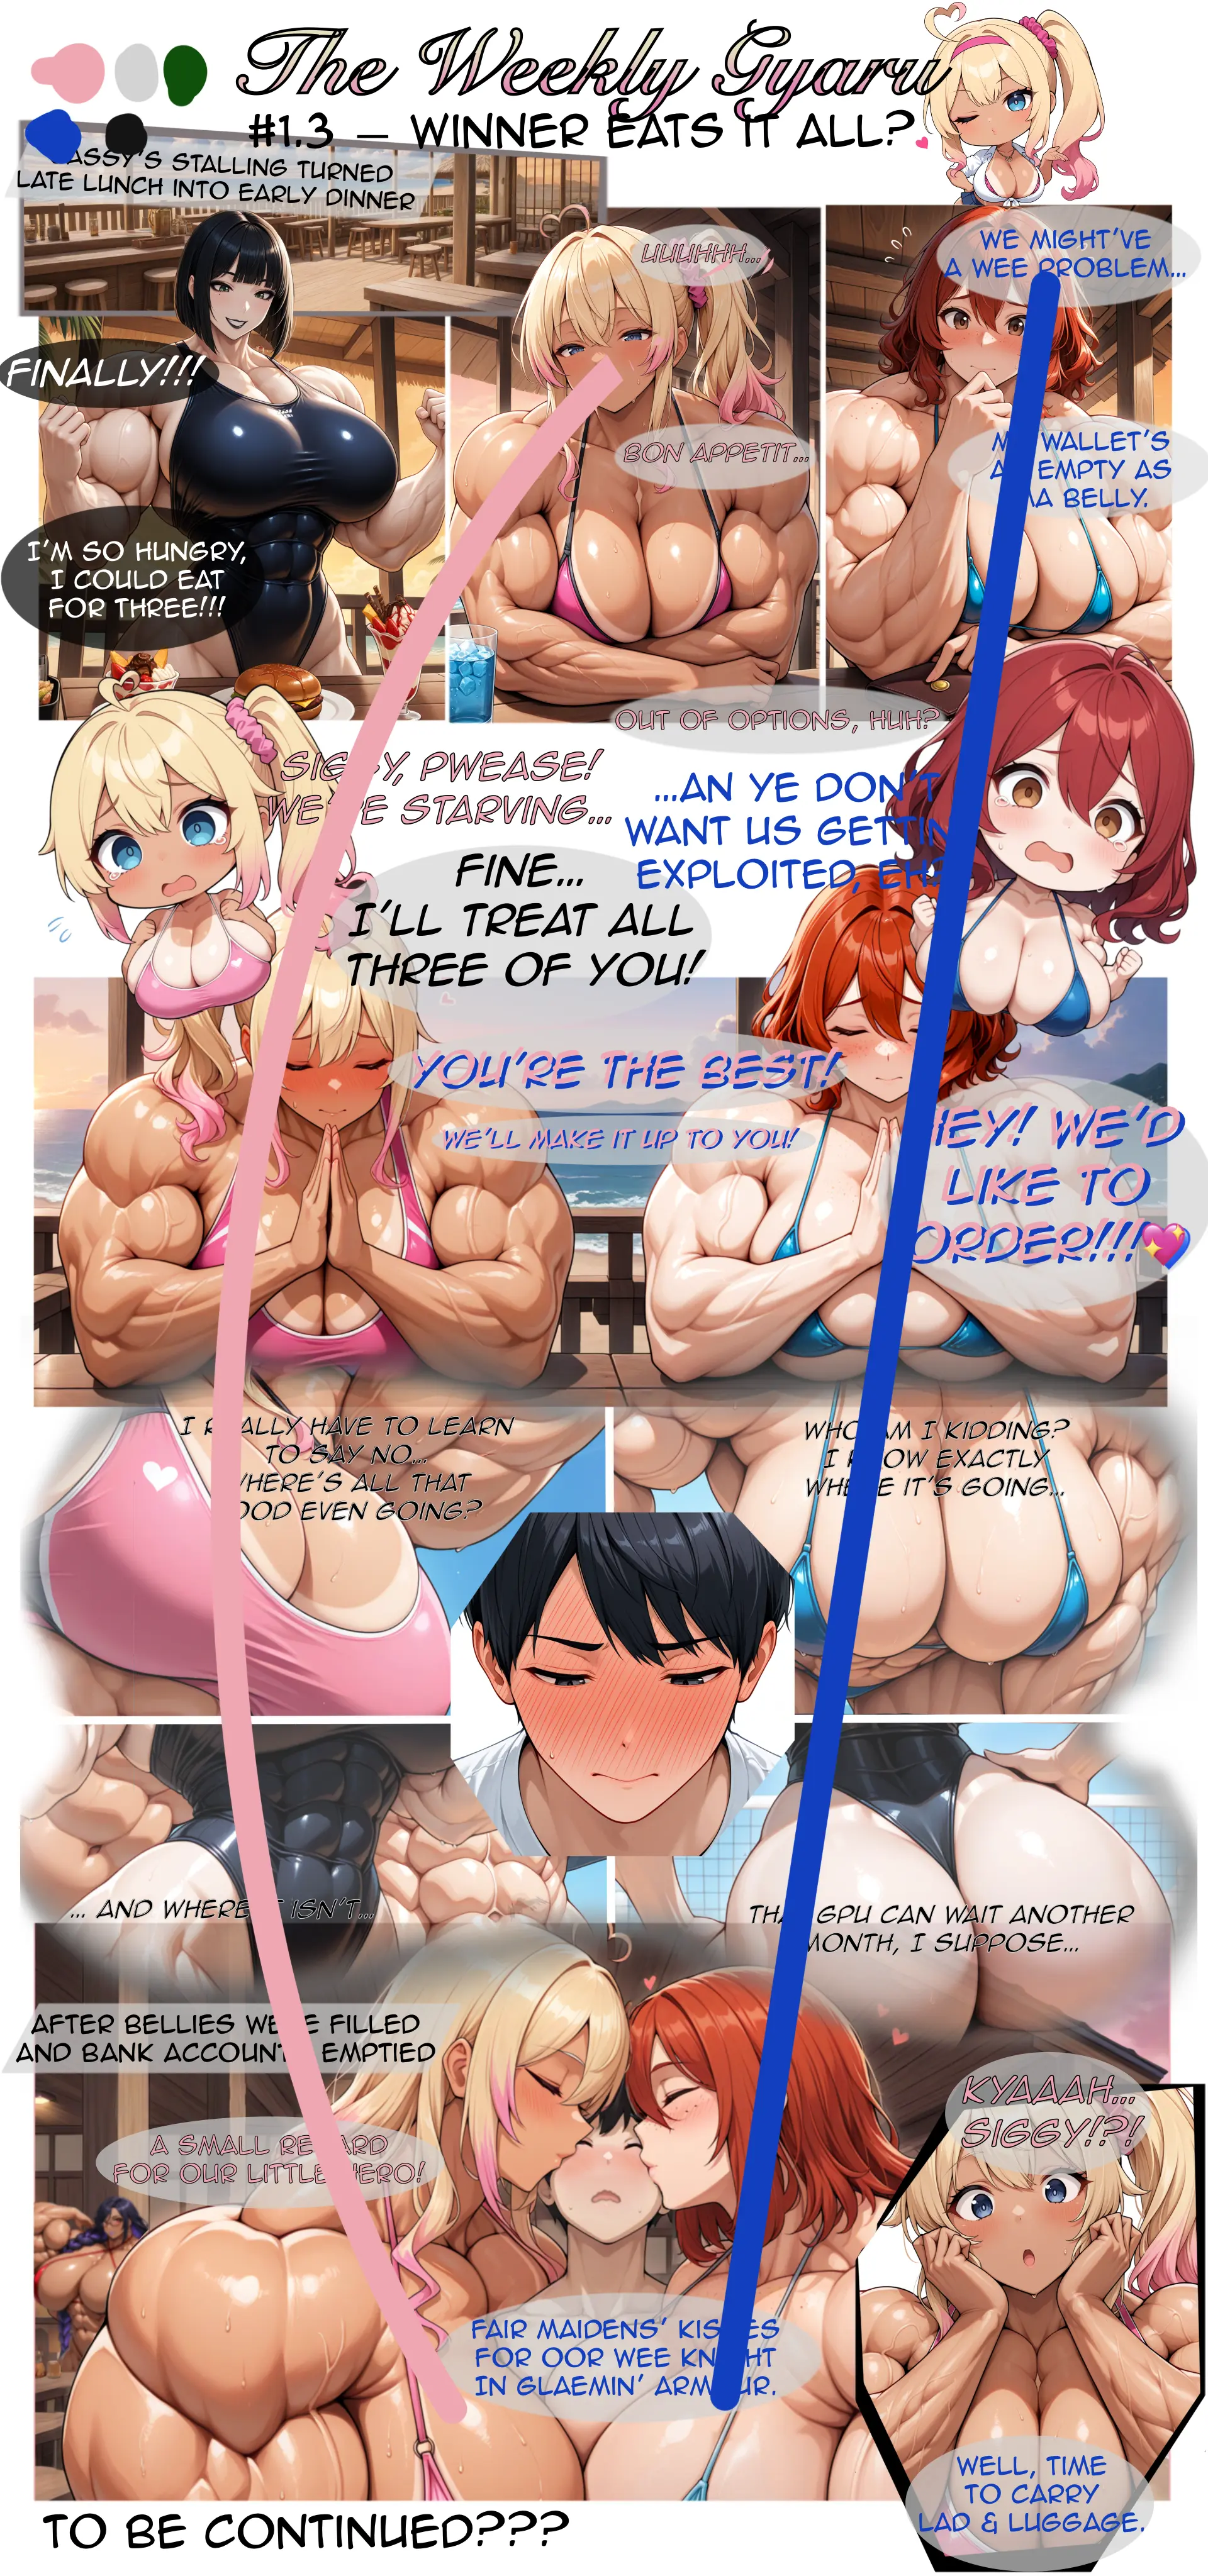
The comic with Akari was pretty smooth sailing, I quickly had a good graps on how many panels I want and how to spread them out. I was done after merely 2-3h, it’s a fairly simple comic, but also keep my glacial generation speed in mind here. Pages for the beach comic often took considerably longer, because I couldn’t fit all my ideas on the page how I imagined them at first.
For the image-gen people… this is usually where I start generating assets for the page I’m working on—not necessarily every panel, but at least the key ones. Personally, I find it helpful to have a few images ready that I can quickly drop in when laying out the page later.
Panel layout
Another broad and content-specific topic, but I’ll share my experiences, a few “rules” I’ve learned, and some tips I’ve received.
A word on page format
This is also content-specific. If you’re making a one-page comic, give yourself as much space as you need. But if you notice that your canvas is getting really long or large, that might be a good indicator that you’re actually trying to make more than just a one-page comic!
If you plan to make a multi-page work from the start, I think it’s probably better to stick to traditional comic page formats. Which seem to be roughly B5 to B4-sized. So an aspect ratio of about 1:1.4–1.5). FYI, here are Shonen Jump’s margin sizes, for example. One of the main benefits of using a standard format is that established “rules of thumb” for layout will more readily apply. Plus, you’ll have a lot of references on how to actually lay out a page! This can help you avoid making pages that feel too empty or too cluttered.
As you might have noticed, my comics are not in that format. They’re actually in 10:21 (mostly, like 19204096), and in hindsight, that was probably not the best idea!*
Laying it all out…
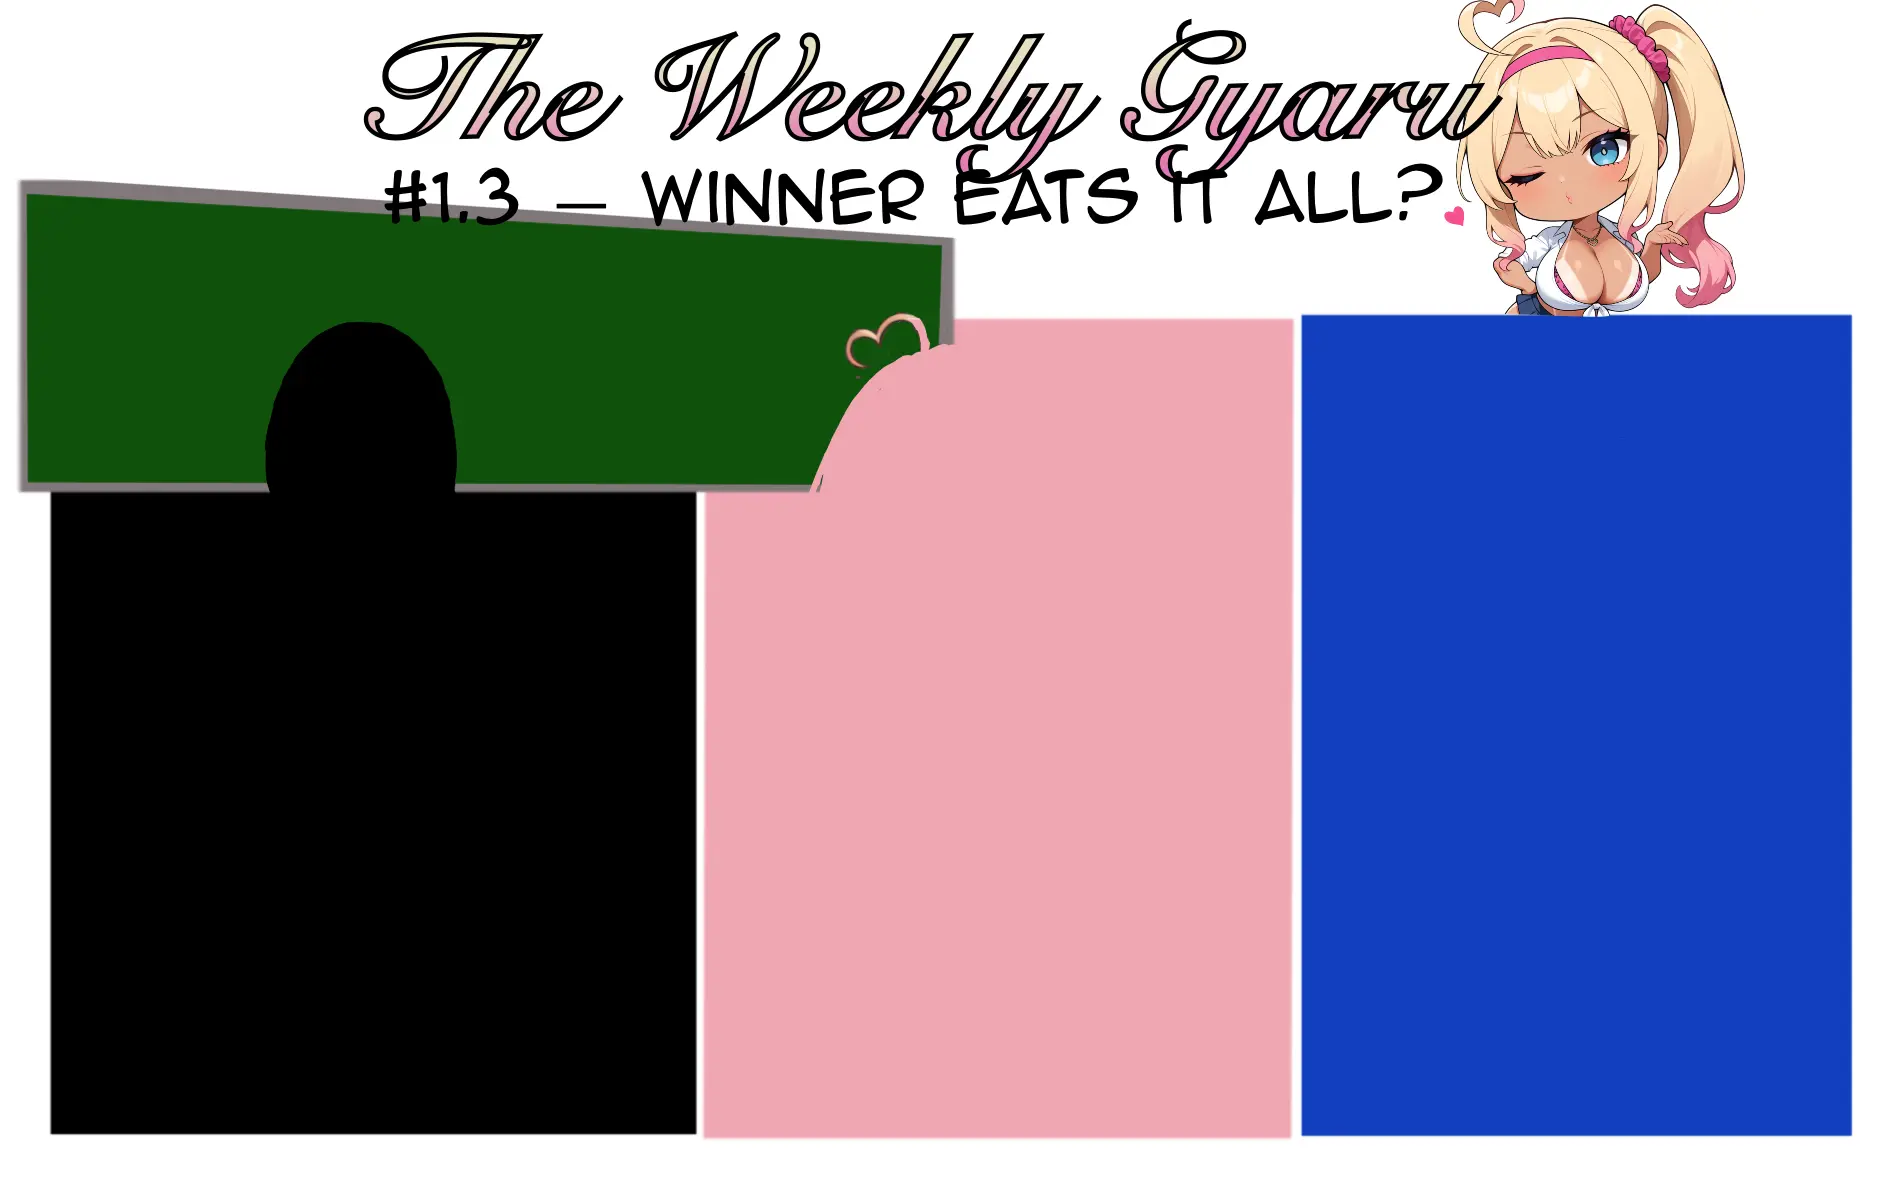
Before I start putting pictures on the page, I try to do a rough layout using simple colored boxes. Most of your panels will probably feature a single character, so I color-code mine based on the subject:
- Cassy = pink
- Mel = black
- Amy = blue
- Siggy/other = grey
- establishing/bg shots = green
- multi char = either use the color of the “main” character, or roughly color in the area they are supposed to be in already
The color coding makes the layout look less monotone, and at least for me, it’s easier to visualize and remember what I actually wanted to put in a specific panel.
Next, we’ll go over a few layout “rules” I’ve picked up—most of these apply primarily to B4-ish or other common comic page formats. If your chosen format is significantly different, you’ll have to adapt!
- Don’t use more than four rows per page. Three rows or less is much more common.
- Stick to a maximum of three panels per row, most of the time.
- A 3×3 grid is a pretty “classic” setup, but it can look a bit too familiar and bland.
- Horizontal spacing should be larger than vertical spacing—in other words, the space between rows should be greater than the space between panels in a row.
- Vary your panel sizes! Some panels are just more important than others and deserve more room. This helps put emphasis where it matters and makes your page look more dynamic.
- Don’t be afraid of a little white space! Obviously, you want to use your limited page space wisely, but sometimes a small panel with a bit of empty room can really help with pacing or mood.
- Keep in mind these are “rules of thumb”. Breaking them can absolutely improve your results—but know when and why you’re breaking them! (This is hard.)
In general, the KISS (“Keep It Simple, Stupid”) design principle applies here, too. Stick to simple boxes for the most part, and only break the grid—like using diagonal panels, small overlaid panels, or having characters break out of their frames—when you feel it genuinely adds to the page’s experience.
You can even use layout for indirect storytelling or characterization. For instance, your bold character could often “invade” other characters’ panels, or elements you want to draw attention to can break out of their panel borders. Try to do these things with intent—not just because 3×3 grids look too bland!
Panel content
In this section, I’ll try to compile a few pointers on what to look out for when actually placing content into your panels. Most of these tips will probably feel intuitive, but you may have experienced moments where something “just looks off” and you couldn’t quite explain why. Keep in mind that everything in this section is also just “general advice” or “rules of thumb” one of these rules have to be followed and breaking them can be a good idea.
Keep spacial relations consistent across panels
- If character A is to the left of character B, they should stay that way—unless they’ve moved, of course. Try not to invert their positions arbitrarily. This applies even within a single panel and single character panels!
- If characters are talking to each other across panels, they should be facing each other consistently. Because of this, try not to break such interactions across separate rows unless there’s a good reason.
Example:
On page three of the Beach comic, I first established Cassy to be on the left and Amy on the right and I tried to keep it that way
Hit the right balance between close-ups, mid-shots and wide-shots.
That’s really easy said, but certainly not as easily done!
- Don’t be afraid to have a few close-ups in a row to show your characters emotional state changing, or to put some extra empashis on a transition from one action to another. Just don’t overdo it—spending two whole rows on a character getting out of a chair, for example, is probably excessive.
- Include a good number of “rest panels.” By that, I mean panels without significant dialogue that (re-)establish where your characters are, both in the environment and in relation to each other. Getting this right will have a positive impact on your page flow and prevents things from appearing too busy.
- Rest panels should probably be very wide shots and/or full body shots of your characters (this can obviosuly be a massive pain with AI and of course having to draw a whole group of people is also a shit ton of work). On how to balance this: One of my favorite artists Rebis (Link to their Patreon) (and a guy kind enough to answer my scrub questions) passed a classic technique he learned onto me:
It’s ideal to include at least one wide shot showing the characters from head to toe every two pages.
Panel flow matters
- Always be mindful of how a reader’s eye moves from one panel to the next. In left-to-right comics, make sure speech bubbles and character placement guide the eye naturally from top left to bottom right in many cases. Too confusing panel layout can break immersion pretty quickly.
- However, examine how your eyes actually move when reading your own pages, if guidance feels natural enough, some unusual layouts can totally work as well!
Filling Your Page and Panels with Generated Images
I’ll quickly describe how I actually get the generated images onto the page:
We’ve laid out our panels with boxes, and we’re going to make good use of them! I keep these layout panels around and just clip the actual image into them. In my software (Procreate), you do this with a Clipping Mask. Your software may do this slightly differently, but the option will certainly be there.
This has a few advantages, in my opinion:
- You can individually resize the bounding box (your panel) and its content (the generated image).
- You can also change the box or its contents non-destructively (e.g., with additional masks).
- It becomes much easier to show only part of your generated image, change its angle, etc.
I often generate images that show more than I initially had in mind. For example, maybe I just want an upper body shot, but I generate a cowboy shot anyway—or I generate a square image when I’m fairly sure the panel will have a different shape. If you have more image than you need, it’s a lot easier to change your mind later.
You should also pre-emptively generate your images at higher resolutions than you think you’ll need for the panel. Scaling images down usually looks fine in most software. Scaling them up… not so much.
Typesetting & Speech bubbles
And at the very end… a few musings on typesetting, speech bubbles and text.
Where to put your bubbles…
In general follow the panel flow and reading direction of your content. If you break from that try to make sure that the bubbles and other elements guide the eyes carefully enough so it’s not too confusing. Try to keep the bubbles close to the speaker and try to keep the text short! You probably don’t want to cover too much of your panel with text (unless there’s a good reason in the story of course) For me speech bubbles and text boxes with a lot of text, almost instantly put my brain in “skip” mode.
How I make my bubbles
I just draw an ellipses (with an ellipses tool) filled with a grey tone (or black for Melanie), reduce it’s opacity to about .7 and the overlay the text layers. I usually put these in the same layer group, so I can easily move them around as a unit, without having to rasterize the text.
Typesetting
Font choice isn’t easy. I use the Anime Ace 2.0 font for most of the text. That one is free for non-commercial use and looks… well Manga enough for my taste. I color code the text as well, so I don’t have to connect the bubbles to the character and you can easily use this for some “off-screen” comment, too. Check your colored text against the background to see if the contrast is sufficient and consider adding an outline to the text to improve readability.
Miscellaneous Tips and Hints
Here are a few more miscellaneous tips that don’t fit anywhere else:
Try to work as non-destructive as possible
If you use a mask to erase some content, you can easily undo this later. If you used the eraser tool, you probably have to go back in your history, possibly undoing other work you wanted to keep.
Separating your base images into layers can make sense:
For example, creating character-only images with the background removed. Maybe you want to blur the background more, adjust the lighting of the scene or on a specific character, etc. Maybe you want the character to break out of the frame, or be larger, but still keep some background element visible—so zooming the whole image won’t cut it.
Example:
The finale of the Beach comic was at night and some panels just turned out too bright (or way too dark), so in a few instances, where I felt it mattered I darkened the BG a bit.
Reuse some assets where you can
You’ve probably made plenty of nice images already… use them again when you get the chance! Maybe you cropped part an image and can reuse the rest in another panel, or maybe an image you’ve already created fits what you’re looking for pretty well anyway.
Example
The final panel in the “Cassy the Professional” comic was straight up from another image I’ve done. And you may also find part of a panel from the Hasshaku-Gyaru-Sama image set in the Beach comic.
Ensure you can make consistent characters
If you have a LoRA for your character or something similar, you’re probably fine. But if you don’t, I’d say you should have your base prompt dialed in well enough that it gets you 90% there, 90% of the time. You probably don’t want to go on a long inpainting and manual editing spree for every panel of a multi-page comic. Basically, you should either be able to do your edits for consistency quickly, or be okay with a little inconsistency.
Example:
The girls and their outfits come out reasonably consistent. But for instance I almost always place Melanie’s mole under her eye manually, I also placed the logo on her swimsuit in the Beach comic manually.
Learn to live with some AI-scuff
The images don’t have to be perfect. You can cover up some problems with a speech bubble, another panel, or smart cropping. And some things you can probably just live with.
Example:
Cassy’s bikini top in the Beach comic is fairly inconsistent, but not enough to distract from the experience (for most people, anyway).
And that’s it! This is all I have, keep in mind I also barely qualify as a beginner, so most or all of this might be pretty stupid advice!
I hope someone may find this useful and if you have any feedback on that article feel free to let me know!
If you have any questions, concerns, or suggestions feel free to contact me at ternarylogic@the-daily-gyaru.gallery